
Want to occupy your kids with something other than electronics? Or are they showing an interest in yoga? Then here is a simple yoga pose to try.
Cow Face Pose
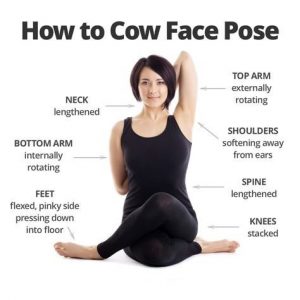
Can’t see the cow face? Notice that the crossed legs look like the lips. The bent-elbow arms, one up and one down, are the ears.
(go-moo-KAHS-anna)
go = cow (Sanskrit go is a distant relative of the English word “cow”)
mukha = face
Cow Face Pose: Step-by-Step Instructions
Step 1
Sit in Dandasana (Staff Pose), then bend your knees and put your feet on the floor. Slide your left foot under the right knee to the outside of the right hip. Then cross your right leg over the left, stacking the right knee on top of the left, and bring the right foot to the outside of the left hip. Try to bring the heels equidistant from the hips: with the right leg on top, you’ll have to tug the right heel in closer to the left hip. Sit evenly on the sitting bones.
Step 2
Inhale and stretch your right arm straight out to the right, parallel to the floor. Rotate your arm inwardly; the thumb will turn first toward the floor, then point toward the wall behind you, with the palm facing the ceiling. This movement will roll your right shoulder slightly up and forward, and round your upper back. With a full exhalation, sweep the arm behind your torso and tuck the forearm in the hollow of your lower back, parallel to your waist, with the right elbow against the right side of your torso. Roll the shoulder back and down, then work the forearm up your back until it is parallel to your spine. The back of your hand will be between your shoulder blades. See that your right elbow doesn’t slip away from the right side of your torso.
Step 3
Now inhale and stretch your left arm straight forward, pointing toward the opposite wall, parallel to the floor. Turn the palm up and, with another inhalation, stretch the arm straight up toward the ceiling, palm turned back. Lift actively through your left arm, then with an exhalation, bend the elbow and reach down to the right hand. If possible, hook the right and left fingers.
Step 4
Lift the left elbow toward the ceiling and, from the back armpit, descend the right elbow toward the floor. Firm your shoulder blades against your back ribs and lift your chest. Try to keep the left arm right beside the left side of your head.
Step 5
Stay in this pose about 1 minute. Release the arms, uncross the legs, and repeat with the arms and legs reversed for the same length of time. Remember that whichever leg is on top, the same-side arm is lower.
Pose Information
Sanskrit Name
Gomukhasana
Pose Level: 1
Contraindications and Cautions
Serious neck or shoulder problems
Modifications and Props
Gomukhasana is a notoriously difficult pose for tight-shouldered people, who aren’t able to hook their fingers together. The simple solution to this dilemma is to hold a strap between the hands. Begin the pose with a strap draped over the shoulder of the bottom arm. In step 2, as you swing the bottom arm behind your back, slide the forearm as high on the back torso as possible (Remember to keep the elbow close to your side), then grab the bottom end of the strap. In step 3, stretch the other arm overhead and then reach down the back for the other end of the strap. Pull with the top arm. See if you can draw the bottom arm higher onto the back. You’re trying to work the hands toward each other and eventually clasp them. Be aware too that you may be able to clasp the hands on one side, but not the other.
Deepen the Pose
You can increase the stretch in this pose if you’re a little more flexible in the shoulders and armpits by moving your hands away from the back of your torso.
Preparatory Poses
Baddha Konasana
Supta Virasana
Supta Baddha Konasana
Supta Padangusthasana
Upavistha Konasana
Virasana
Follow-up Poses
Ardha Matsyendrasana
Bharadvajasana
Garudasana
Marichyasana III
Padmasana
Paschimottanasana
Upavistha Konasana
Beginner’s Tip
Beginners often have a difficult time getting both sitting bones to rest evenly on the floor, which can make it difficult for the knees to stack on top of each other evenly. When the pelvis is tilted, the spine can’t properly extend. Use a folded blanket or bolster to lift the sitting bones off the floor and support them evenly.
Benefits
Stretches the ankles, hips and thighs, shoulders, armpits and triceps, and chest
Partnering
A partner can help you increase the stretch in the back of the top arm. Have her stand behind you as you perform the pose (in this example the left arm is high). She should take her left hand on the back of your upper left arm and gently pull it back and up, as she presses her right hand forward against your left shoulder blade.
Variations
From the full pose, lean forward and lay the front torso down on the inner top thigh. Stay for 20 seconds, then inhale and come up.
Post Your Comments