Nail art designs express their style statement in an inventive manner. This trend is picking up its craze from the time female celebrities have adorned them. The trend is also achieving its fame right among the models on the ramp to the school going girls and everybody loves to flaunt their nail art.
Let’s go ahead and take a look at these rainbow nail arts.
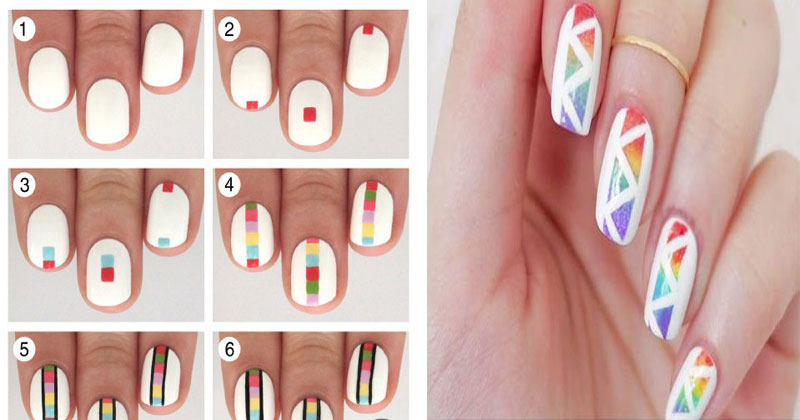
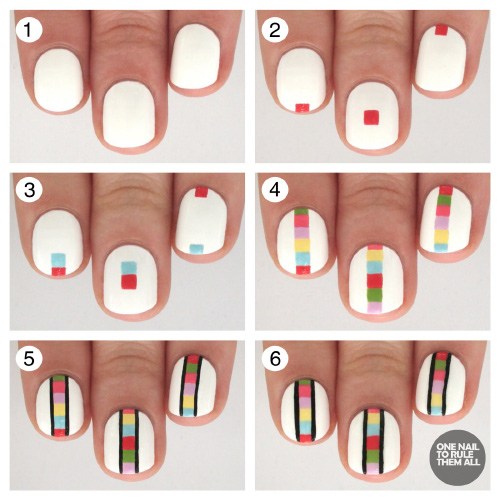
- A Rainbow Ladder
You Will Need
- Small sized rectangular brush
- White nail polish
- Multiple colours of nail polish for the rainbow effect
- Nail striper
- Black nail polish
A Rainbow Ladder Nail Art Tutorial
- Start with white as your base.
- Now, using the rectangular brush dipped in red polish, create a square in different places as shown.
- Take the next colour and do the same.
- Keep doing this till you have your rainbow stripe complete.
- Now, use a nail striper to create a stripe on either side, so that it looks like a ladder.
- That’s all! Finish off with a top coat, and you’re ready to climb your ladder.
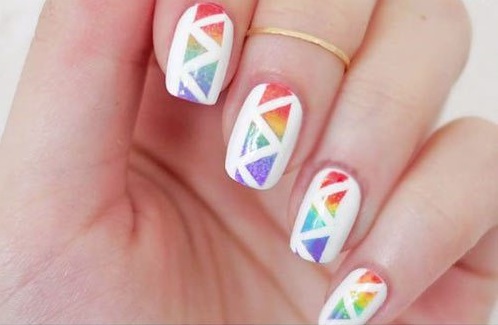
Geometric Rainbow Patterns
You Will Need
- White nail polish
- Red nail polish
- Orange nail polish
- Yellow nail polish
- Blue nail polish
- Purple nail polish
- Makeup sponge
- Nail striper/fine brush
- Tape
Tutorial
- Apply the white as a base coat.
- Place two pieces of tape on either side of the nail, as shown.
- Apply stripes of nail polish in the order of the rainbow onto the makeup sponge.
- Dab it onto the nails till you are happy with the results.
- Use a nail striper to create zigzags on the coloured rainbow ombre as seen in the image.
- Seal it with a top coat – it’s as easy as that.
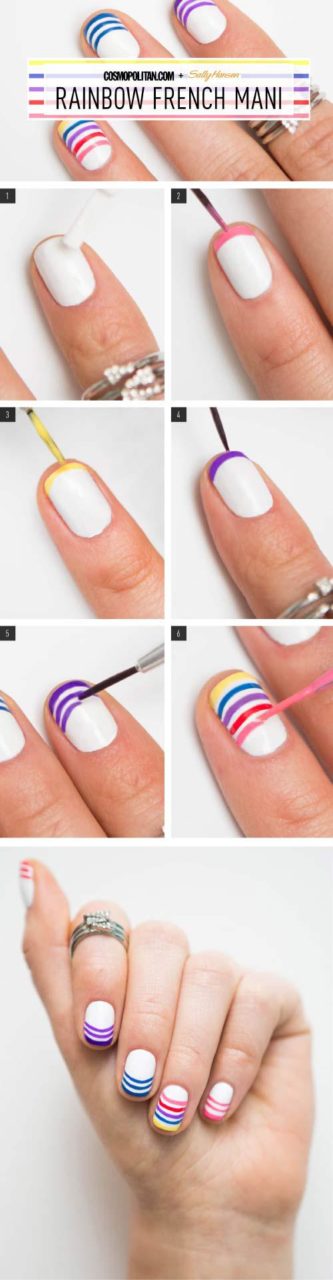
Rainbow French Mani
You Will Need
- White nail polish
- Various colours of nail polish
- Nail striper
- Rainbow French Mani Tutorial
- Start with a white base.
- Pick a colour for each finger, except for the ring fingernail. This one will have all the colours.
- Paint one thick layer at the tip with the nail striper, as though you were doing a French manicure. Now, create two more lines below that.
- Do the same with the other colours on the rest of the nails.
- For the ring finger, however, create curved lines with multiple colours so that they look like a rainbow.
- There you have it – a rainbow French manicure! Don’t forget to seal it with a top coat!
Post Your Comments